其他
极路由4刷机
米沃奇 波箱保养
玩客云
玩客云刷第三方系统
玩客云-Home Assistant
服务器采购
RTL9210/RTL9210B
随身WiFi
固件备份与恢复
Debian
Debian-文件共享
Debian-物联网
Debian-授权
Debain-ZeroTier
Debian-自启动脚本
Debian-拓展内存
Debian-清理空间
Debian-USB控制
Debian-adb进9008
Debian-常见问题
Debian-快速使用
随身WiFi使用
切卡
快速找摄像头IP
edu教育邮箱申请
域名邮箱(转发)-Cloudflare
Web监控工具
WxPusher(微信消息推送)
WxPusher-API推送
WxPusher-Python推送
WxPusher-Shell推送
WxPusher-挪车通知
企业微信-应用
Godlike-免费游戏服务器
GitHub 国内访问(host)
常用螺丝替代型号
GitHub Actions
workflows-同步上游仓库(覆盖)
workflows-⭐同步上游仓库
workflows-构建 Docker镜像
FAT32不可读
Kindle
Kindle-救砖
Kindle-越狱
中国移动-RAX3000Q(Y)
OpenWrt
网络奇葩问题
小米手环_BandTOTP
本文档使用 MrDoc 发布
-
+
首页
Debian
**相关链接:** - OpenStick_GitHub:https://github.com/OpenStick/OpenStick/releases - OpenStick刷机教程:https://www.kancloud.cn/handsomehacker/openstick/2636506 - 随身WIFI遥控车:https://www.kancloud.cn/a813630449/ufi_car/2779674 - Debian下载地址:https://www.123pan.com/s/XwVDVv-WICn3#1234 ## 刷机 Debain 教程 ### 整合固件 刷机 需要下载对应型号的 1. 下载 `Debian` 所需文件,并解压 2. 棒子通过 `adb模式` 进入 `fastboot 模式` `fastboot 模式` 可以通过 `搞机工具箱` 进入,或是执行 `adb reboot bootloader` 如果没有开启 `adb模式` 可参考下方的 `解锁 adb 模式` 3. 执行解压文件夹中的 `flash.bat` 刷入后 NDIS 和 WiFi 访问地址为 `192.168.86.1` 用户名 `root` 密码 `1` 也可通过 adb 访问,cmd 执行 `adb shell`,无需账户密码 ### [超频版](https://www.coolapk.com/feed/41664623?shareKey=ZjgwZGM2NWE5MGEwNjM5OTcwMzM~&shareUid=20775713&shareFrom=com.coolapk.market_12.5.0) 刷机 支持 `LDW92x/sp970/ufi103S/ufiw001/uz801/ufi001b/ufi001c/ufi003` 1. 下载对应型号的 [debian 超频版](https://h5.cloud.189.cn/share.html#/t/neAnmabAnYji),并解压 2. 棒子确保开启 `adb模式`,如果没有开启可参考下方的 `解锁 adb 模式` 3. 运行 `一键刷入工具.bat`,选择需要刷入的超频频率进行刷入 注意:`骁龙410发热很大默认0.9GHz都热,超频一定要搭配改装散热使用,有些品质太差的刷入超频后会无法开机!` 刷入后 默认热点 `4G-wifi` 密码 `12345678` NDIS 和 WiFi 访问地址为 `10.42.0.1` 用户名 `root` 密码 `1313144` 也可通过 adb 访问,cmd 执行 `adb shell`,无需账户密码 ### OpenStick 刷机 支持 `ufi001b(默认)/ufi001c/SP970/UZ801` 1. 下载 [OpenStick](https://github.com/OpenStick/OpenStick/releases) 所需文件,并解压 `base.zip(ufi001b/c) 或 base-generic.zip(其他通用版型)`、`debian.zip(Debain系统)` 2. 使用本机型的 `boot.img`(Premium Tool 备份的) 替换 `debian.zip` 中的 `boot.img` 3. 棒子通过 `adb模式` 进入 `fastboot 模式` `fastboot 模式` 可以通过 `搞机工具箱` 进入,或是执行 `adb reboot bootloader` 如果没有开启 `adb模式` 可参考下方的 `解锁 adb 模式` 4. 执行 `base-generic 或 base` 中的 `flash.bat` 5. 执行 `debian` 中的 `flash.bat` ### 重新刷机 1. 把 `NDIS 驱动` 卸载,重新插拔,会显示一个没有驱动的设备 2. `选中 右键 -> 更新驱动 -> 浏览我的电脑以查找驱动程序 -> Android Device -> Android Composite Adb Interface(ADB)` 3. 进入 `fastboot 模式`,可以通过 `搞机工具箱` 进入,或是执行 `adb reboot bootloader` 4. 执行 `flash.bat` 重新刷机 ### 释放内存 **相关链接:** - [已编译-UFI00* 系列通用](https://github.com/iovxw/lk2nd/releases/tag/v0.0.0) - [修改RAM运存的方法](https://github.com/HandsomeMod/HandsomeMod/issues/23) - [能否出一个仅使用wifi接入内网当作服务器的固件版本,减少预留内存](https://github.com/OpenStick/OpenStick/issues/7) ```bash free -m # 查看内存情况(MB) free -g # 查看内存情况(GB) ``` 默认的带有 SIM、GPS、显卡 等相关模块,可用内存只有 385M 可以替换 aboot 来取消这些模块的占用,实现可用内存为 473M 1. 下载大佬写改好的 [aboot](https://github.com/iovxw/lk2nd/releases/tag/v0.0.0),UFI00* 系列通用 2. 棒子进 9008 模式 3. 使用 `Qualcomm Premium Tool` 替换 aboot 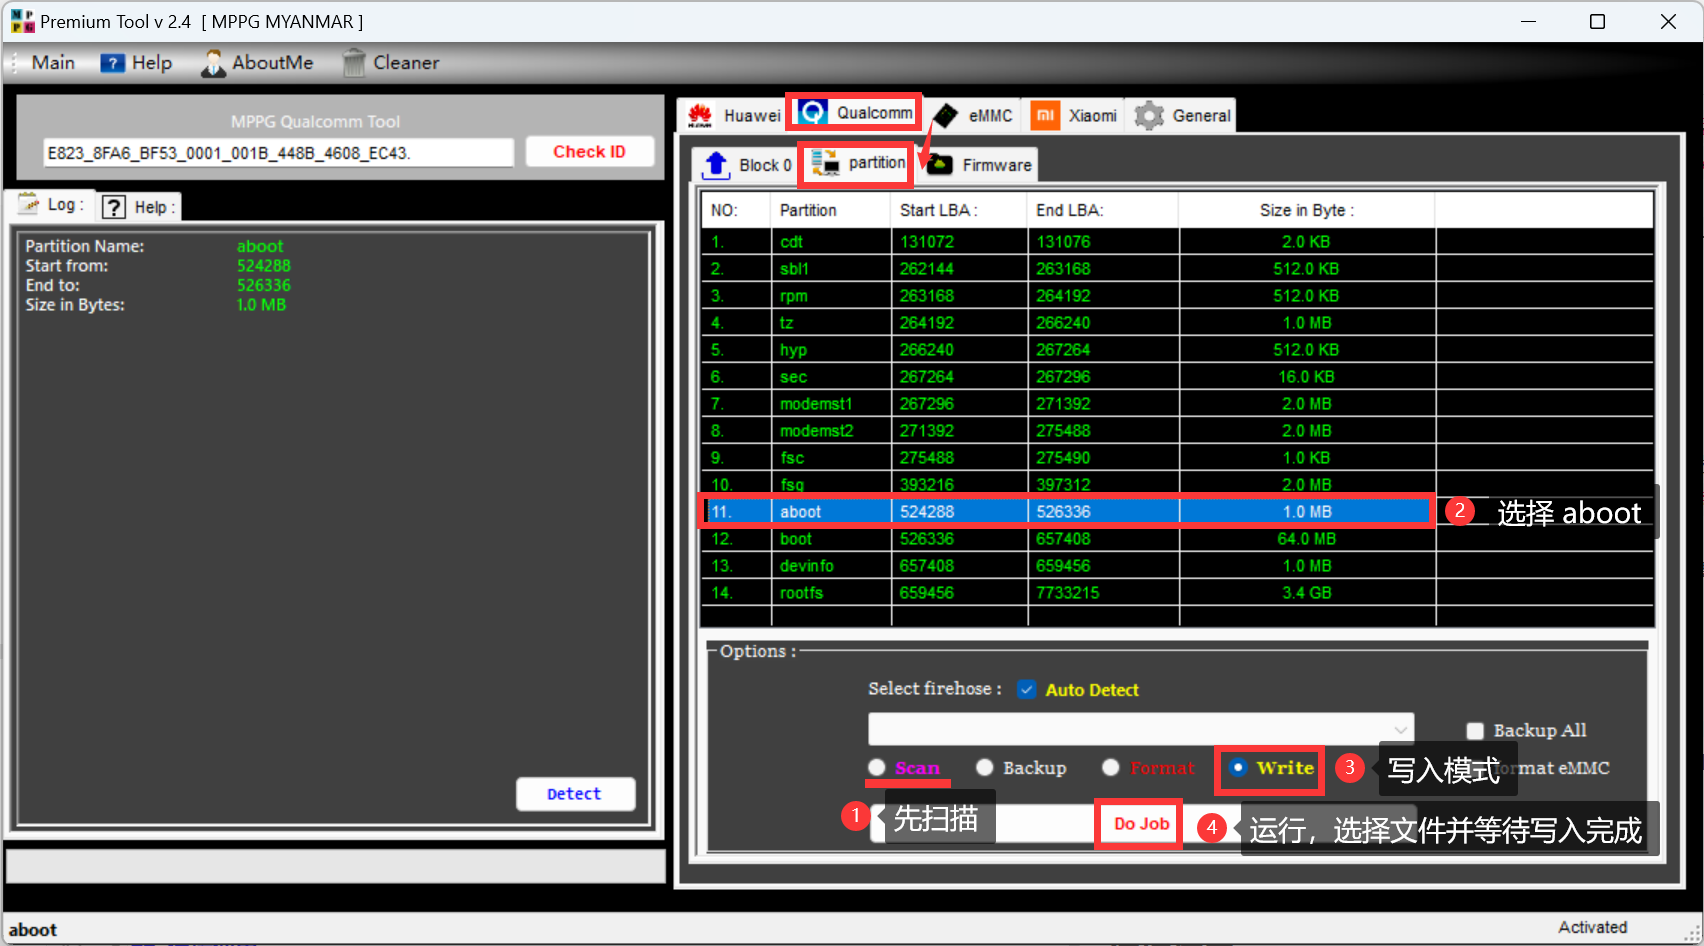 >w 也可在直接替换 Debian 包内的 `aboot.bin`,然后正常烧录 ## 连接使用 NDIS网络连接(虚拟网卡) 1. 打开 设备管理器, `此电脑 -> 管理 -> 设备管理器` 2. 找到未安装驱动的 `RNDIS` 设备 没有可能是识别成了 `Android Device 设备`,卸载驱动后重新插拔 3. 安装成 `网络适配器——基于NDIS网络共享设备` `选中RNDIS 右键 -> 更新驱动 -> 浏览我的电脑以查找驱动程序 -> 网络适配器 -> Microsoft -> 基于NDIS网络共享设备` 4. 现在已经可以正常访问了(虚拟网卡) >w 如果连接后没网了或是网速慢,可以在 更改适配器设置(控制面板\网络和 Internet\网络连接) 中设置 NDIS IPv4/IPv6 的跃点值为 999 ### 修改网络 ```bash /ufi.sh # 修改SSID与密码,根目录下的脚本 nmtui # 连接网络 # 连接 WiFi nmtui # 进入网络配置 # 编辑连接——网桥——bridge——编辑——网桥从机——选中 wifi——删除——确认(不删除会无法连接WiFi) # 启用连接——Wi-Fi——选择要连接的 WiFi 进行连接 # WIFI 可以和 NDIS 共存 # 注意,不可激活USB网卡,激活后NDIS就无法使用 # WiFi 热点 + NDIS nmtui # 进入网络配置 # 创建 网桥,ip地址为192.168.68.1/24(/etc/dnsmasq.conf 可改地址),配置名和设备名随意 # 网桥中 添加 以太网,配置名随意,设备名(ifconfig / nmcli查看)格式为 usb0 (5E:13:36:99:51:9C) # 网桥中 添加 WiFi 配置名随意,设备名(ifconfig / nmcli查看)格式为 wlan0 (02:00:DC:D3:28:05),其他根据需求配置 nmcli connection show # 查看当前连接 nmcli connection <up/down> <设备名> # up 激活,down 禁用 ``` ## Debian12 换源 群里大佬给的更新源 ```bash # 清华大学 Debian 镜像源 - 主仓库 deb https://mirrors.tuna.tsinghua.edu.cn/debian/ bookworm main contrib non-free non-free-firmware deb-src https://mirrors.tuna.tsinghua.edu.cn/debian/ bookworm main contrib non-free non-free-firmware # 清华大学 Debian 镜像源 - 更新仓库 deb https://mirrors.tuna.tsinghua.edu.cn/debian/ bookworm-updates main contrib non-free non-free-firmware deb-src https://mirrors.tuna.tsinghua.edu.cn/debian/ bookworm-updates main contrib non-free non-free-firmware # 清华大学 Debian 镜像源 - 回溯仓库 deb https://mirrors.tuna.tsinghua.edu.cn/debian/ bookworm-backports main contrib non-free non-free-firmware deb-src https://mirrors.tuna.tsinghua.edu.cn/debian/ bookworm-backports main contrib non-free non-free-firmware # Debian 安全更新源 deb https://security.debian.org/ bookworm-security main contrib non-free deb-src https://security.debian.org/ bookworm-security main contrib non-free ``` ## 常见问题处理 ```bash export TERM=linux # 设置linux环境变量 # 更新软件后 RNDIS 无法使用(主要是 mobian-tweaks-common 软件问题) apt-mark hold mobian-tweaks-common # 把 mobian-tweaks-common 排除更新,然后在正常更新就行 cat /usr/sbin/mobian-usb-gadget # 更新后会删除该文件(这是特征之一,光补上这个没用) # 更新后 RNDIS 无法获取IP(因为更新dnsmasq配置被替换了),重新配置 tee /etc/dnsmasq.conf <<-'EOF' interface=nm-bridge dhcp-range=nm-bridge,192.168.68.2,192.168.68.254,12h dhcp-option=nm-bridge,3,192.168.68.1 EOF # 在 nm-bridge 设备上添加DHCP服务 # 设置 192.168.68.2~254 范围,12h有效期 # 3,192.168.68.1,设置网关为192.168.168.1 service dnsmasq restart # 重启 dnsmasq 服务 # N: 仓库'https://mirrors.tuna.tsinghua.edu.cn/debian bookworm InRelease'将其'Version'值从'12.1'修改到了'12.6' # W: 校验数字签名时出错。此仓库未被更新,所以仍然使用此前的索引文件。GPG 错误:http://repo.mobian.org bookworm InRelease: 下列签名无效: EXPKEYSIG 951D61F2BC232697 Mobian Project <admin@mobian-project.org> # W: 无法下载 http://repo.mobian.org/dists/bookworm/InRelease 下列签名无效: EXPKEYSIG 951D61F2BC232697 Mobian Project <admin@mobian-project.org> # W: 部分索引文件下载失败。如果忽略它们,那将转而使用旧的索引文件。 apt install -y gnupg2 # 安装 gnupg2 wget http://repo.mobian.org/mobian.gpg && apt-key add mobian.gpg # 下载并添加新签名 # AdoptOpenJDK报错:E: 仓库“http://mirrors.tuna.tsinghua.edu.cn/AdoptOpenJDK/deb buster Release” 不再含有 Release 文件 sudo sed -i '1c deb http://mirrors.tuna.tsinghua.edu.cn/Adoptium/deb buster main' /etc/apt/sources.list.d/AdoptOpenJDK.list gpg --keyserver hkp://keyserver.ubuntu.com:80 --recv-keys 843C48A565F8F04B sudo gpg --armor --export 843C48A565F8F04B | sudo apt-key add - # mobian源报错:E: 仓库 “http://repo.mobian-project.org bullseye Release” 不再含有 Release 文件 sudo sed -i '1c #deb http://repo.mobian-project.org/ bullseye main non-free' /etc/apt/sources.list.d/mobian.list ## 方式二: echo "deb http://repo.mobian-project.org/ bookworm main non-free" > /etc/apt/sources.list.d/mobian.list curl -s https://repo.mobian.org/mobian.gpg > /etc/apt/trusted.gpg.d/mobian.gpg # 运行时收到 GPG 错误?apt-get update # 默认掩码可能配置不正确,导致无法检测到 存储库公钥文件,尝试授予 Docker 的读取权限 更新包索引之前的公钥文件 sudo chmod a+r /etc/apt/keyrings/docker.gpg sudo apt-get update # 局域网IP无法连接上SSH # 使用 RNDIS 接入后输入下列命令 apt install -y ufw ufw default allow # Configuring openssh-server 配置openssh服务器 # -------------------------- # A new version (/tmp/tmp.2P6qu1o1vR) of configuration file /etc/ssh/sshd_config is available, but the version installed # 配置文件/etc/ssh/sshd_config的新版本(/tmp/tmp.2P6qu1o1vR)可用,但已安装版本 # currently has been locally modified. 当前已被本地修改 # 1.安装软件包维护者的版本 5.显示可用版本之间的3向差异 # 2.保持当前安装的本地版本 6.在可用版本之间进行3向合并 # 3.显示版本之间的差异 7.启动一个新的shell来检查情况 # 4.显示两个版本之间的并排差异 # 您想对修改后的配置文件sshd_config做些什么? ``` ## 其他 ```bash # 安装 宝塔 wget -O install.sh http://download.bt.cn/install/install-ubuntu_6.0.sh && bash install.sh ed8484bec # 安装 Docker,也可通过宝塔安装 curl -fsSL https://get.docker.com -o get-docker.sh sudo sh get-docker.sh sudo apt-get update sudo apt-get install ca-certificates curl gnupg lsb-release # 更新软件包索引并安装软件包 sudo mkdir -p /etc/apt/keyrings curl -fsSL https://download.docker.com/linux/debian/gpg | sudo gpg --dearmor -o /etc/apt/keyrings/docker.gpg # 添加 Docker 的官方 GPG 密钥 echo "deb [arch=$(dpkg --print-architecture) signed-by=/etc/apt/keyrings/docker.gpg] https://download.docker.com/linux/debian $(lsb_release -cs) stable" | sudo tee /etc/apt/sources.list.d/docker.list > /dev/null # 设置存储库 sudo apt-get update sudo apt-get install docker-ce docker-ce-cli containerd.io docker-compose-plugin # 安装最新版本 # 解决软件源问题 echo -e 'nnnnnnnnnn####################################n' sudo rm /etc/apt/sources.list sudo touch /etc/apt/sources.list echo -e "# 默认注释了源码镜像以提高 apt update 速度,如有需要可自行取消注释\n\ndeb https://mirrors.tuna.tsinghua.edu.cn/debian/ bullseye main contrib non-free\n# deb-src https://mirrors.tuna.tsinghua.edu.cn/debian/ bullseye main contrib non-free\n\ndeb https://mirrors.tuna.tsinghua.edu.cn/debian/ bullseye-updates main contrib non-free\n# deb-src https://mirrors.tuna.tsinghua.edu.cn/debian/ bullseye-updates main contrib non-free\n\ndeb https://mirrors.tuna.tsinghua.edu.cn/debian/ bullseye-backports main contrib non-free\n# deb-src https://mirrors.tuna.tsinghua.edu.cn/debian/ bullseye-backports main contrib non-free\n\ndeb https://mirrors.tuna.tsinghua.edu.cn/debian-security bullseye-security main contrib non-free\n# deb-src https://mirrors.tuna.tsinghua.edu.cn/debian-security bullseye-security main contrib non-free" >> /etc/apt/sources.list echo -e '1、默认软件源修改完成!nn' sudo sed -i '1c deb http://mirrors.tuna.tsinghua.edu.cn/Adoptium/deb buster main' /etc/apt/sources.list.d/AdoptOpenJDK.list gpg --keyserver hkp://keyserver.ubuntu.com:80 --recv-keys 843C48A565F8F04B sudo gpg --armor --export 843C48A565F8F04B | sudo apt-key add - echo -e 'nn2、AdoptOpenJDK报错修复完成!nn' sudo sed -i '1c #deb http://repo.mobian-project.org/ bullseye main non-free' /etc/apt/sources.list.d/mobian.list echo -e '3、Mobian源报已屏蔽!' echo -e 'nn####################################nn即将开始更新软件源list......n' sleep 5 sudo apt-get update echo -e 'nn4、更新软件源list更新完成!' echo -e 'nn####################################nn即将开始升级系统程序至最新版......' sleep 5 sudo apt-mark hold openssh-server sudo apt-get -y upgrade sudo apt-mark unhold openssh-server echo -e 'nn5、系统程序更新完成!nn####################################nnnn' # 执行扩容 btrfs filesystem resize max # 查看内存寿命 cat /sys/class/mmc_host/mmc0/mmc0\:0001/life_time # 0X04 用了40%的寿命,0X08 用了80%的寿命,0X00 看不到寿命 # 开启usb拓展 ## 手动设置 echo host > /sys/kernel/debug/usb/ci_hdrc.0/role # 手动设置USB拓展 echo gadget > /sys/kernel/debug/usb/ci_hdrc.0/role # 手动设置主机模式 ## 通过 mobian-usb-gadget 设置(开机自启) nano /usr/sbin/mobian-usb-gadget echo host > /sys/kernel/debug/usb/ci_hdrc.0/role # 启用这条命令(USB拓展) ## 通过启动脚本设置(开机自启) nano /etc/rc.local echo host > /sys/kernel/debug/usb/ci_hdrc.0/role # 添加USB拓展 # 关闭LED灯 echo none > /sys/class/leds/blue:wifi/trigger # 蓝色LED(WIFI状态灯) echo none > /sys/class/leds/red:os/trigger # 红色LED(系统状态灯) ``` ## 快速克隆 烧录并配置好的棒子,进入 9008模式 使用 `MiKo·推荐(单文件方便)` 或是 `Qualcomm Premium Tool` 进行整机备份 然后直接通过 9008模式 直接烧录 重启后就可使用 ## 启动运行的脚本 可能跟 RNDIS 有关,`/etc/rc.local` ```bash nmcli connection up USB sleep 5 nmcli connection down USB ``` **相关教程:** [随身WiFi 高通410 UFI103s刷debian系统 刷机过程记录](https://www.bilibili.com/read/cv24666539/)
造物者W
2024年8月23日 23:28
转发文档
收藏文档
上一篇
下一篇
手机扫码
复制链接
手机扫一扫转发分享
复制链接
Markdown文件
分享
链接
类型
密码
更新密码