Home Assistant
Home Assistant 安装
Home Assistant
Docker-Home Assistant
群晖VM-Home Assistant(Supervisor)
Supervisor
Supervisor-无插件
Hacs 家庭助理社区商店
Hacs-和风天气
无法下载
自定义储存库灰色
MQTT
MQTT-红外接收
Tasmota(免编程智能家居)
Tasmota 简易使用
Tasmota 常见指令
Tasmota 重置设备
Tasmota-MQTT
Tasmota-Rules(规则)
Tasmota-Web控制
其它未测试项目
本文档使用 MrDoc 发布
-
+
首页
Docker-Home Assistant
Docker版 [Home Assistant](https://www.home-assistant.io/installation/alternative#install-home-assistant-container) 本例子是用群晖安装,群晖只是作为一个容器,其他任何支持 Docker 的设备都可以安装,群晖和正常Docker代码安装都会举例 ## HASS 安装 ### 群晖 #### 下载镜像 在 Docker——注册表——搜索`homeassistant/home-assistant`——下载 推荐下载 `stable(稳定)` 的 #### 创建容器 ##### 储存空间 挂载 本地文件夹 到 `/config`  ##### 网络 推荐使用 `host` 网络 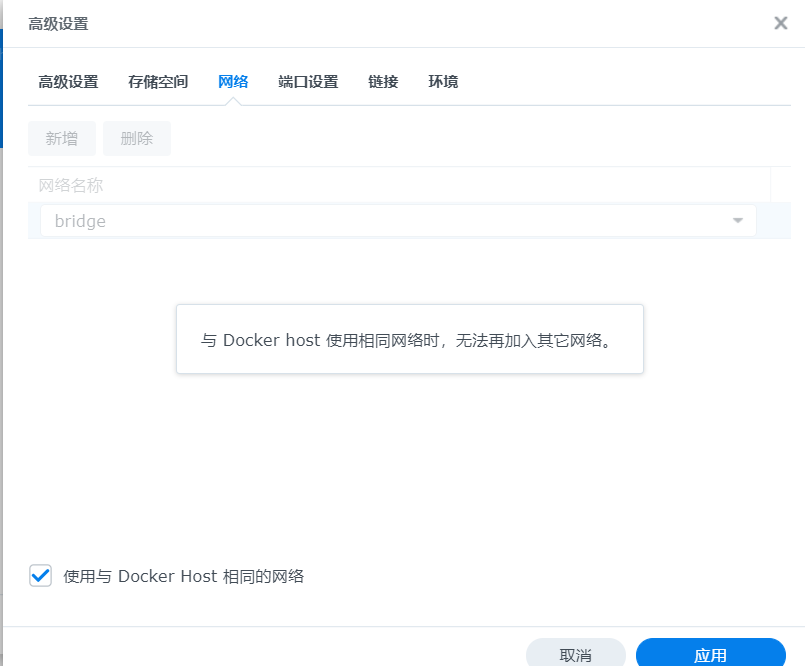 > 如果使用默认的 `bridge`,手动映射容器端口 > 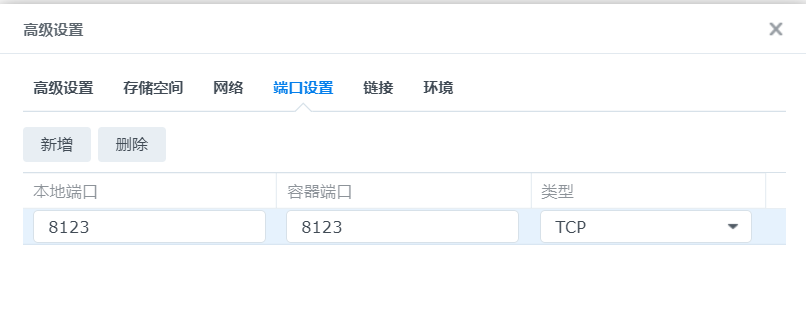 ##### 环境 新建两个环境,`variable=TZ` 和 `value=Asia/Shanghai` 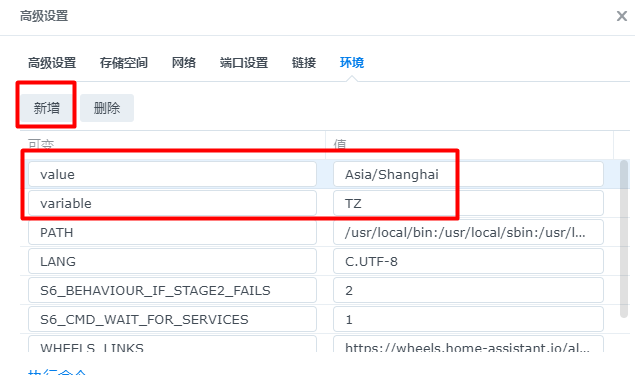 [时区](https://en.wikipedia.org/wiki/List_of_tz_database_time_zones)改成实际的 创建成功后使用:`http://[IP]:8123` 进行登录 ### Docker 安装 ``` docker run -d \ --name homeassistant \ --privileged \ --restart=unless-stopped \ -e TZ=Asia/Shanghai \ -v /Dokcer/homeassistant :/config \ --network=host \ ghcr.io/home-assistant/home-assistant:stable ``` 自行修改 存储文件夹,指向区域为`/config` `TZ` 是 [时区](https://en.wikipedia.org/wiki/List_of_tz_database_time_zones),如TZ=Asia/Shanghai 创建成功后使用:`http://[IP]:8123` 进行登录 #### Docker 更新 ``` # 如果是最新的就不需要继续了 docker pull ghcr.io/home-assistant/home-assistant:stable # 停止运行的容器 docker stop homeassistant # 删除容器 docker rm homeassistant # 重新创建 docker run -d \ --name homeassistant \ --restart=unless-stopped \ --privileged \ -e TZ=Asia/Shanghai \ -v /Dokcer/homeassistant :/config \ --network=host \ ghcr.io/home-assistant/home-assistant:stable ``` ## HACS 安装 [Hacs](https://hacs.xyz/) 是类似于应用商城的一个插件,官方不自带,需要手动安装 对于 Docker 来说,Hacs 安装要较为复杂点 SSH 登录 ``` sudo -i #切换为root docker exec -it homeassistant bash #进入hass容器 ``` > 群晖可以直接在 终端机——新增一个终端就可以直接使用 ``` # 以下命令为容器内执行 wget -O - https://get.hacs.xyz | bash - #如果下载不下来,可以直接在外部放入转载的目录下 exit #安装完成后退出容器 ``` > 因为 Github 对国内很不友好,这里提供一个折中的方式 > `https://get.hacs.xyz` 代码复制(放到下面了),在外部或是容器内创建`hacs.sh` > 把复制的代码粘贴进去,使用 `./hacs.sh` 执行 > 如果执行中,下载 `hacs.zip` 失败 > 编辑 `hacs.sh`,找到`wget "https://github.com/hacs/integration/releases/latest/download/hacs.zip"` > 替换为 `wget "http://nas.918178.xyz:3000/attachments/c1141f22-25e6-41d8-924f-a231ac07b81b" -O hacs.zip` > 然后再执行,这个是用国内 Git 替换无法正常使用的 Github > hacs.sh 代码 ``` #!/bin/bash # wget -O - https://get.hacs.xyz | bash - set -e RED_COLOR='\033[0;31m' GREEN_COLOR='\033[0;32m' GREEN_YELLOW='\033[1;33m' NO_COLOR='\033[0m' declare haPath declare -a paths=( "$PWD" "$PWD/config" "/config" "$HOME/.homeassistant" "/usr/share/hassio/homeassistant" ) function info () { echo -e "${GREEN_COLOR}INFO: $1${NO_COLOR}";} function warn () { echo -e "${GREEN_YELLOW}WARN: $1${NO_COLOR}";} function error () { echo -e "${RED_COLOR}ERROR: $1${NO_COLOR}"; if [ "$2" != "false" ]; then exit 1;fi; } function checkRequirement () { if [ -z "$(command -v "$1")" ]; then error "'$1' is not installed" fi } checkRequirement "wget" checkRequirement "unzip" info "Trying to find the correct directory..." for path in "${paths[@]}"; do if [ -n "$haPath" ]; then break fi if [ -f "$path/home-assistant.log" ]; then haPath="$path" else if [ -d "$path/.storage" ] && [ -f "$path/configuration.yaml" ]; then haPath="$path" fi fi done if [ -n "$haPath" ]; then info "Found Home Assistant configuration directory at '$haPath'" cd "$haPath" || error "Could not change path to $haPath" if [ ! -d "$haPath/custom_components" ]; then info "Creating custom_components directory..." mkdir "$haPath/custom_components" fi info "Changing to the custom_components directory..." cd "$haPath/custom_components" || error "Could not change path to $haPath/custom_components" info "Downloading HACS" wget "http://nas.918178.xyz:3000/attachments/c1141f22-25e6-41d8-924f-a231ac07b81b" -O hacs.zip if [ -d "$haPath/custom_components/hacs" ]; then warn "HACS directory already exist, cleaning up..." rm -R "$haPath/custom_components/hacs" fi info "Creating HACS directory..." mkdir "$haPath/custom_components/hacs" info "Unpacking HACS..." unzip "$haPath/custom_components/hacs.zip" -d "$haPath/custom_components/hacs" >/dev/null 2>&1 info "Removing HACS zip file..." rm "$haPath/custom_components/hacs.zip" info "Installation complete." echo info "Remember to restart Home Assistant before you configure it" else echo error "Could not find the directory for Home Assistant" false echo "Manually change the directory to the root of your Home Assistant configuration" echo "With the user that is running Home Assistant" echo "and run the script again" exit 1 fi ``` 在 配置——服务控制 中重启服务,也可以直接重启容器 配置——集成,点击右下+号,搜索HACS,安装集成(要确保和Github的网络正常) 随后会有个提示,全部勾就行了 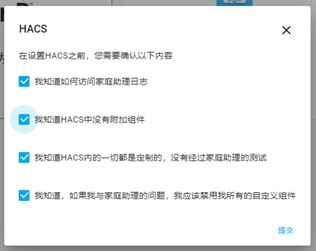 Github授权,点击上方的链接,登录Github帐号,然后输入下方的代码,进行授权到HACS 然后就添加完成,分配区域可以不需要分配 左侧会多个HACS的选项,图标刷新下就可以出来了  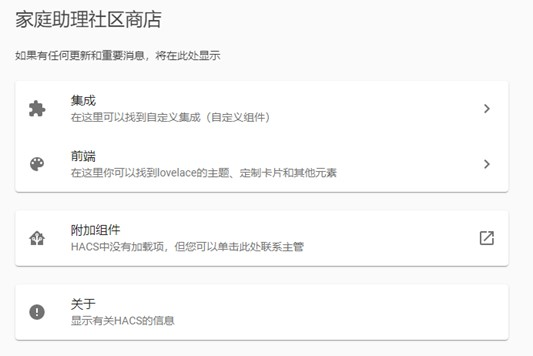 刚安装后会在Github中下载内置的软件,需要比较长的时间进行下载,等一会就好了,HACS is starting up这一项就会消失 后面就可以通过HACS——integrations 进行安装所需要的插件了(右下+号) ### HASS 配置器 [在线Ymal编辑器](https://github.com/danielperna84/hass-configurator) SHH 登录 ``` sudo -i #切换为root docker exec -it homeassistant bash #进入hass容器 ``` #### 使用 pip 安装 ``` # 以下命令为容器内执行 pip install hass-configurator #使用pip安装 hass-configurator #运行hass配置器 ``` `hass-configurator -h` 可以查看更多命令 `hass-configurator -seb ${PWD}` 在独立模式下启动配置器(隐藏了一些家庭助理相关的面板并且不尝试与家庭助理 API 通信),并锁定对命令所在文件夹中的文件和文件夹的访问被处决 #### 手动安装(不再更新) * 将[configurator.py](https://github.com/danielperna84/hass-configurator/blob/master/configurator.py)复制到您的 Home Assistant 配置目录 * `wget https://raw.githubusercontent.com/danielperna84/hass-configurator/master/configurator.py` * `wget http://nas.918178.xyz:3000/WJ/hass-configurator/raw/commit/cedc9506669f85a11b419f8970ec396bd4b56b3c/configurator.py` * 使其可执行 (`sudo chmod 755 configurator.py`) * (可选)如果您的系统上安装了[GitPython](https://gitpython.readthedocs.io/),则将`GIT`变量设置为`configurator.py` `True` * (可选)如果要使用基于时间的功能(见下文),请安装[pyotp](https://github.com/pyotp/pyotp)`SESAME` * 执行 (`sudo ./configurator.py`) * 要终止该进程,请执行通常的操作 <kbd>Ctrl</kbd>+<kbd>C</kbd> #### 配置 在`configurator.py`中有配置,不过还是推荐作为独立文件进行配置 `py文件`和`conf(JSON格式)` 配置文件的区别在于 `None` 变成 `null` 默认[配置参考](https://github.com/danielperna84/hass-configurator/blob/master/settings.conf) `wget http://nas.918178.xyz:3000/WJ/hass-configurator/raw/commit/cedc9506669f85a11b419f8970ec396bd4b56b3c/settings.conf` ``` { "LISTENIP": "0.0.0.0", #监听地址 "PORT": 3218, #监听端口 "GIT": false, "BASEPATH": "/root/.homeassistant", #软件打开默认目录 "ENFORCE_BASEPATH": false, "SSL_CERTIFICATE": "/data/*.xxx.com.cer", #cert证书文件存放位置 "SSL_KEY": "/data/*.xxx.com.key", #key证书文件存放位置 "SSL": true, #是否启用https "IGNORE_SSL": false, "HASS_API": "http://127.0.0.1:8123/api/", #Home Assistant API通信地址 "HASS_WS_API": "admin", #API 用户名 "HASS_API_PASSWORD": "itcommander", #API 密码 "USERNAME": "admin", #访问configurator的用户名 "PASSWORD": "itcommander", #访问configurator的密码 "ALLOWED_NETWORKS": [], #地址白名单 "ALLOWED_DOMAINS": [], #域名白名单 "BANNED_IPS": [], #黑名单地址 "BANLIMIT": 0, "IGNORE_PATTERN": [], "DIRSFIRST": false, "SESAME": null, "SESAME_TOTP_SECRET": null, "VERIFY_HOSTNAME": null, "ENV_PREFIX": "HC_", "NOTIFY_SERVICE": "persistent_notification.create" } ``` 在外网使用时一定要`加密码`,不然任何人都可以通过这个修改你的配置文件 密码可以用[SHA256](https://www.strerr.com/cn/sha256.html)来进行加密,书写样式(123456):`"PASSWORD": "{sha256}a718d5239ea6724fb9e49939073681459547851570e0b46cb962cdbba6b1719c",` 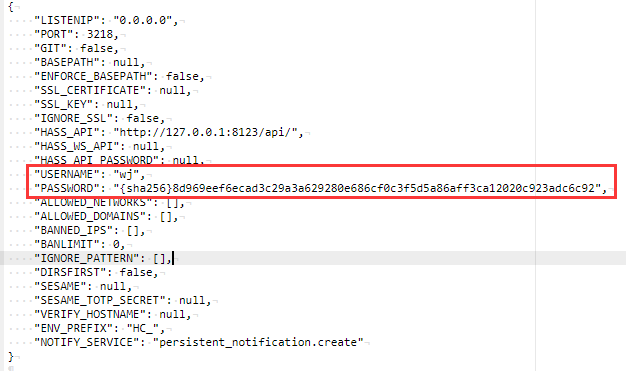 带配置运行: * pip安装,`hass-configurator settings.conf` `nohup hass-configurator settings.conf &`后台运行 * 手动安装,使用 `.configurator.py /config/mysettings.conf` `nohup sudo .configurator.py /config/mysettings.conf &`后台运行,运行不了试试`nohup python configurator.py settings.conf &`,注意适配 #### 添加到面板 [iframe 面板](https://www.home-assistant.io/integrations/panel_iframe) 配置介绍 `vi configuration.yaml` ``` panel_iframe: configurator: title: Configurator icon: mdi:wrench url: http://1.2.3.4:3218 ``` 其中`ip`需要修改为服务器对应地址,使用`127.0.0.1`只能内网使用 然后重启服务,刷新浏览器就可以在左侧查看到 ## ESPHome 对于 Docker版 来说,是没有 `Supervisor 面板` 的,所以我们需要[手动进行安装](https://www.esphome.io/guides/getting_started_command_line.html) ### ESPHome_Docker 拉取镜像 `docker pull esphome/esphome` ~~生成基础配置文件~~ ~~`docker run --rm -v /volume2/docker/Hass/esphome/:/config -it esphome/esphome wizard livingroom.yaml` #注意,配置文件保存位置自行修改~~ ~~根据提示配置以下基础信息~~ 启用 ESPHome 仪表板 ``` docker run -d --rm -p 6052:6052 -e ESPHOME_DASHBOARD_USE_PING=true -v /volume2/docker/Hass/esphome/:/config -it esphome/esphome #无密码 docker run -d -it --name esphome -p 6052:6052 -e USERNAME=用户名 -e PASSWORD=密码 -v /volume2/docker/Hass/esphome/:/config esphome/esphome #带密码 docker run -d -it --name esphome --device=/dev/ttyUSB0 -p 6052:6052 -e USERNAME=用户名 -e PASSWORD=密码 -v /volume2/docker/Hass/esphome/:/config esphome/esphome #带USB ``` [](主题 https://community.home-assistant.io/t/a-different-take-on-designing-a-lovelace-ui/162594)
造物者W
2023年2月10日 12:25
转发文档
收藏文档
上一篇
下一篇
手机扫码
复制链接
手机扫一扫转发分享
复制链接
Markdown文件
分享
链接
类型
密码
更新密码